
Jump to Recipe
There’s something quietly satisfying about a dessert that doesn’t try too hard. This Japanese sweet potato cake, called satsumaimo cake or imo youkan in some forms, is one of those.
The base is simple: cooked Japanese purple-skinned sweet potato, butter, sugar, cream, and egg yolk. No cake flour, no leavening. The result is dense in the best way, almost like a thick shortbread meets a smooth potato truffle.
I first made this after picking up satsumaimo at a Japanese grocery and not wanting to just roast them. One batch and I understood why this dessert shows up in every Japanese convenience store.
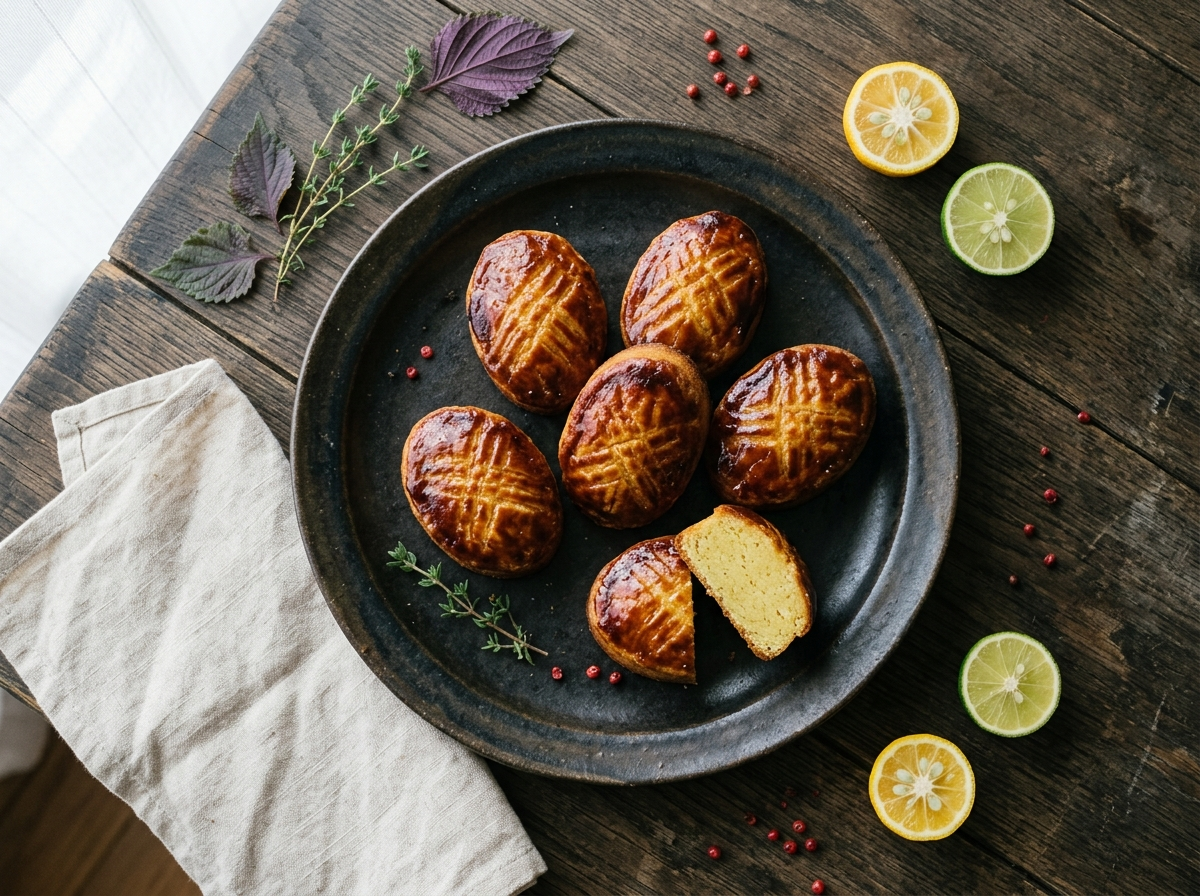
You shape the mixture, brush it with egg wash, and bake until the outside is deep golden. Inside stays pale yellow and soft.
Why You’ll Love This Recipe
- No mixer needed, just a bowl and fork
- Ready in under 45 minutes start to finish
- Naturally sweet from satsumaimo, no frosting needed
- Stores well for 3 days without drying out
Ingredient Notes
- Japanese sweet potato (satsumaimo): Purple-skinned with pale yellow flesh. The dry, starchy texture is key to the cake holding its shape. Regular orange sweet potato works but the texture will be slightly wetter and less firm.
- unsalted butter: Use room-temperature butter so it blends into the warm potato without clumping. Coconut oil can substitute but adds a faint coconut flavor.
- heavy cream: Adds richness and helps smooth out the mash. Whole milk can substitute but the mixture will be slightly less silky.
- egg yolk: Two uses here: one yolk goes into the dough for binding, a second yolk mixed with soy sauce makes the egg wash that gives the cakes their dark golden sheen.
- granulated sugar: Regular white sugar works fine. Reduce by 10 g if your satsumaimo is particularly sweet. Caster sugar dissolves a little faster into the warm mash.
- soy sauce (for egg wash): Just a few drops mixed into the egg yolk wash. This is a traditional trick that adds color depth and a very faint savory note. Skip it if you prefer a simpler glaze.
Japanese Sweet Potato Cake
Ingredients
Method
- Peel and cut the satsumaimo into 3 cm cubes. Place in a steamer basket over boiling water.
- Steam for 18 to 20 minutes until a skewer slides through with no resistance.
- Transfer to a mixing bowl and mash immediately while still hot, using a potato ricer or pressing through a fine-mesh sieve for the smoothest result.
- Add the butter to the hot mash and stir until fully melted and combined.
- Add the sugar and salt, then stir until dissolved, about 1 minute.
- Let the mixture cool to warm, not hot, then mix in the heavy cream and egg yolk until the dough is smooth and holds its shape when pressed.
- Divide the dough into 8 equal portions, about 70 g each.
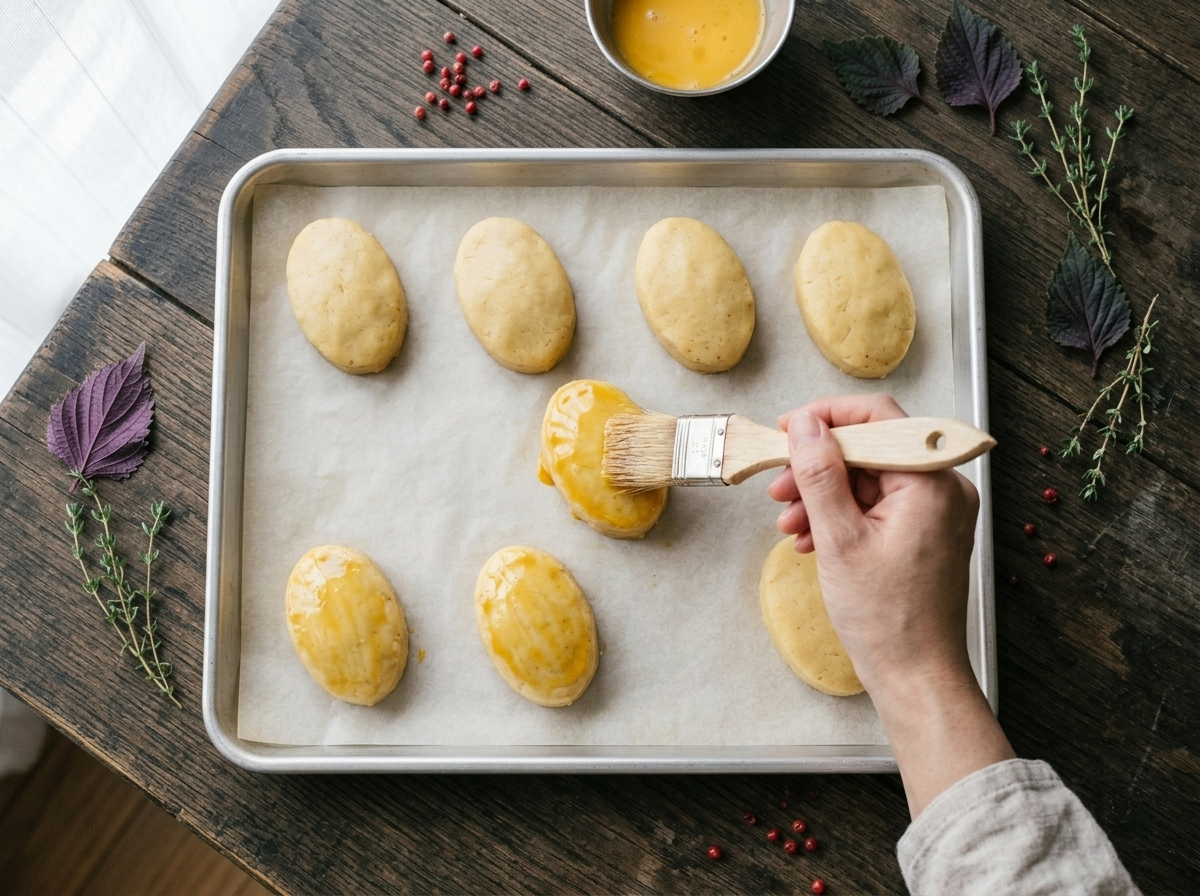
- Place each portion on a piece of plastic wrap, fold the wrap over, and shape into a smooth oval about 7 cm long.
- Place the shaped cakes on a parchment-lined sheet pan and refrigerate for 15 minutes.
- Heat the oven to 180 C / 355 F.
- Whisk together the egg yolk and soy sauce in a small bowl until combined.
- Brush the top and sides of each chilled cake with a thin layer of egg wash. Let sit for 2 minutes.
- Using a small sharp knife, score a shallow crosshatch pattern on the top of each cake.
- Apply a second coat of egg wash over the scored surface.
- Bake on the middle rack for 22 to 25 minutes until the surface is deep golden brown and the crosshatch pattern is defined.
- Remove from the oven and cool on the pan for at least 10 minutes before serving. The cakes firm up slightly as they cool.
Notes
Tips for Success
- Steam the sweet potato rather than boiling it to keep the flesh dry and prevent a watery dough.
- Mash while still hot so the butter melts evenly into the potato without lumps.
- Chill the shaped cakes for 15 minutes before baking so they hold their oval form in the oven.
- Apply the egg wash in two thin layers, letting the first dry for 2 minutes before adding the second for a deep, lacquered finish.
- Score a shallow crosshatch pattern on top before the second egg wash coat to get the classic ridged look.
Variations
- Add 1 tsp matcha powder to the dough for a green tea version with a mildly bitter edge.
- Mix in 30 g of white sesame paste for a nuttier, slightly denser texture inside.
- Swap heavy cream for coconut cream and butter for vegan butter to make a dairy-free version that still holds its shape well.
Storage and Reheating
Store in an airtight container at room temperature for up to 2 days, or in the fridge for up to 4 days. Wrap each piece in plastic wrap so the surface doesn’t dry out.
To reheat, place in an oven at 160 C / 320 F for 5 to 7 minutes. This refreshes the exterior without drying the inside. Microwaving for 20 seconds also works, though the skin softens.
These freeze well. Wrap individually and freeze for up to 6 weeks. Thaw overnight in the fridge, then warm in the oven before serving.
Serving Suggestions
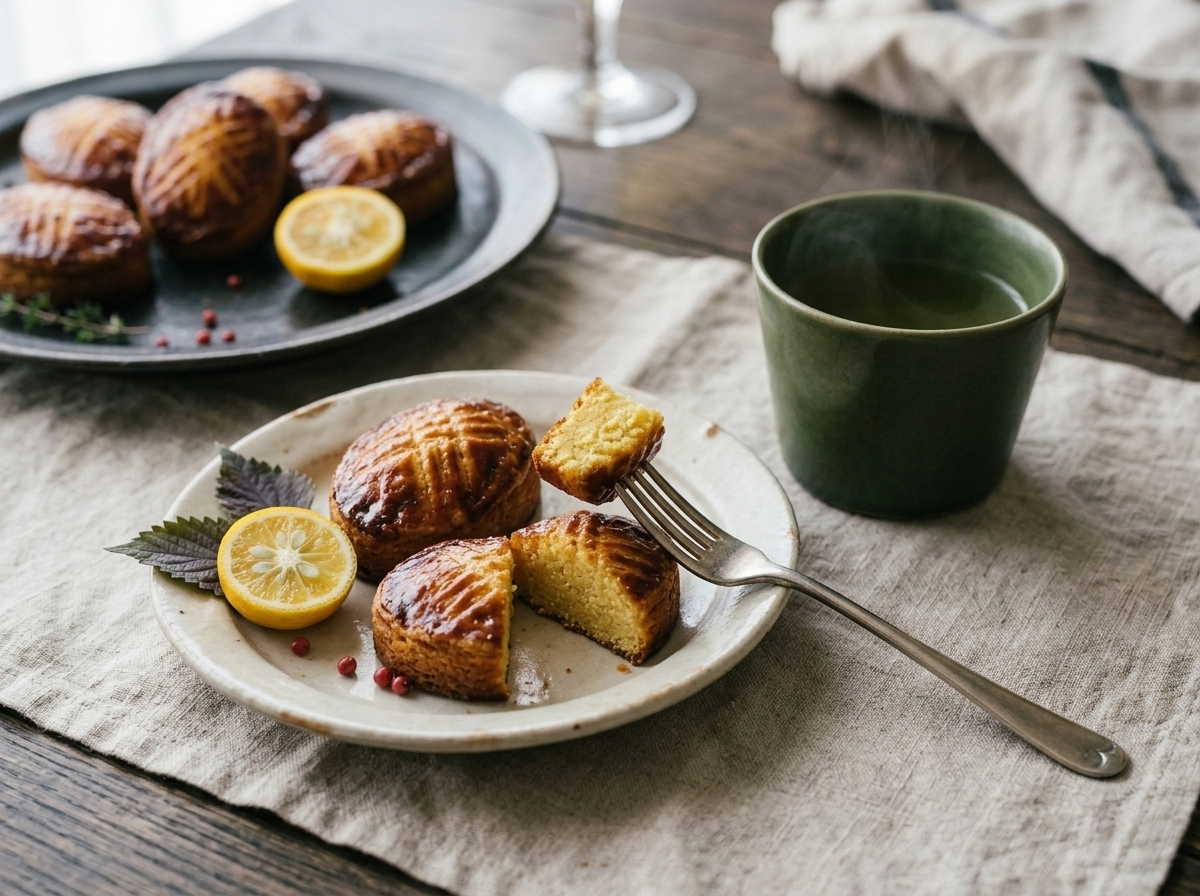
Serve at room temperature as part of a Japanese-style tea snack spread alongside hojicha or green tea, the same way you might pair tea with a warmly spiced pudding cake. The faint sweetness pairs well with the slight bitterness of both.
Cut each piece in half to show the pale yellow interior when serving to guests. That contrast between the dark glazed exterior and soft inside looks striking on a small plate.
These also work as a lunchbox treat or a post-dinner snack. A small scoop of vanilla ice cream on the side turns it into a simple plated dessert, or serve it alongside a ginger coconut custard for a fuller spread.
FAQ
Why is my Japanese sweet potato cake cracking on top?
Light surface cracks are normal and even traditional on satsumaimo cake. Deep splitting usually means the dough was too dry, so add a teaspoon more cream next time to keep it pliable.
Can I use orange sweet potato instead of Japanese satsumaimo?
You can, but orange sweet potato has more moisture and less starch, so the mixture will be softer and harder to shape. Steam it and let it cool uncovered to let some moisture escape before mixing.
Can I freeze Japanese sweet potato cake before baking?
Yes. Shape and score the cakes, then freeze on a lined tray until solid. Transfer to a freezer bag for up to 4 weeks. Bake from frozen at 180 C / 355 F, adding about 8 extra minutes.
What tea goes well with satsumaimo cake?
Hojicha is the classic match because its roasty, low-bitterness flavor complements the earthy sweetness of the potato. Genmaicha and straight sencha both work well too.
Is Japanese sweet potato cake gluten-free?
This recipe contains no wheat flour, so it’s naturally gluten-free. Check that your soy sauce is gluten-free too, since standard soy sauce contains wheat. Tamari is a safe swap.
What’s the difference between satsumaimo cake and imo youkan?
Imo youkan is set with agar and sliced into blocks, more like a firm jelly. Satsumaimo cake uses butter and egg yolk to bind, giving it a softer, richer texture closer to a baked confection.