
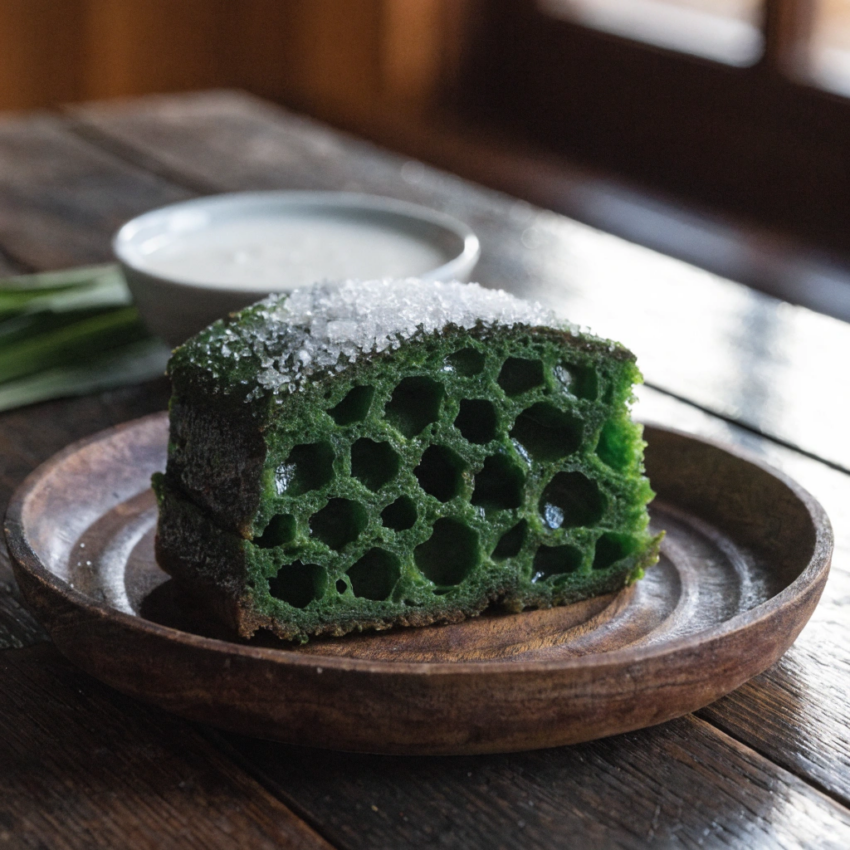
If there’s one cake that always sparks curiosity in my kitchen, it’s Vietnamese banh bo nuong honeycomb cake. The first time I sliced into it and saw that signature honeycomb pattern, I actually paused. It’s one of those desserts that feels a little magical—but it’s very doable at home.
This Vietnamese honeycomb cake recipe is light, springy, slightly chewy, and rich with pandan aroma. It’s the kind of dessert you make once… and then crave again a week later.
What Is Vietnamese Banh Bo Nuong?
Banh bo nuong is a baked Vietnamese dessert known for its airy, honeycomb-like interior. That structure comes from a mix of eggs, sugar, and starch interacting with heat in a very specific way.
It’s often called:
- Vietnamese honeycomb cake
- Pandan honeycomb cake
- Vietnamese pandan cake
The flavor? Mildly sweet. Coconut-rich. Fragrant from pandan. The texture sits somewhere between cake and chewy sponge.
Ingredients for Vietnamese Honeycomb Cake
Here’s everything you need for this banh bo nuong recipe:
- 1 cup tapioca starch
- 1 cup coconut milk (full fat works best)
- 3/4 cup sugar
- 5 large eggs (room temperature)
- 1 tbsp pandan extract (for color + aroma)
- 1/2 tsp salt
- 1 tsp baking powder
- 1 tbsp vegetable oil (for greasing pan)
These are classic Vietnamese honeycomb cake ingredients. Keep them simple. No swaps if it’s your first attempt.
How To Make Vietnamese Honeycomb Cake
This part matters. Technique controls the honeycomb texture.
Step 1: Heat Coconut Mixture
In a saucepan, combine coconut milk, sugar, and salt. Heat on low.
Stir until sugar dissolves. Don’t boil.
Let it cool slightly before moving on.
Step 2: Beat the Eggs (Gently)
Crack eggs into a bowl.
Whisk slowly. You’re not making foam here. Avoid bubbles.
Too much air ruins the honeycomb structure.
Step 3: Combine Everything
Add the warm coconut mixture into the eggs.
Mix gently.
Add pandan extract.
Sift in tapioca starch and baking powder.
Stir until smooth. No lumps.
Step 4: Strain the Batter
This step is often skipped. Don’t skip it.
Pour batter through a sieve to remove bubbles and lumps.
You’ll get a smoother crumb later.
Step 5: Preheat the Pan
Place your baking pan in the oven while preheating to 350°F (175°C).
A hot pan is key for that honeycomb effect.
Step 6: Bake
Grease the hot pan lightly.
Pour batter in.
Bake for 40–50 minutes.
Do not open the oven early. That’s how cakes collapse.
Step 7: Cool Upside Down
Once baked, remove the cake.
Invert it immediately and let it cool completely.
This keeps the structure from shrinking.
What Makes the Honeycomb Texture Work?
Let’s break it down simply.
The “honeycomb” comes from:
- Proper egg mixing (not too airy)
- Hot pan at the start
- Correct balance of liquid and starch
Think of it like this: the batter expands in vertical channels. If you disturb it with bubbles or temperature changes, those channels collapse.
So yes, this cake has rules.
But once you understand them, it’s smooth sailing.
Flavor Profile: What To Expect
This pandan honeycomb cake with coconut milk has a soft sweetness. It’s not heavy like butter cake.
You’ll notice:
- A light chew from tapioca starch
- Creamy coconut notes
- A floral, grassy hint from pandan
It’s subtle. Not loud. That’s the charm.
Tips For Perfect Banh Bo Nuong
I’ve made this more times than I can count. Here’s what actually helps.
1. Don’t Overwhisk Eggs
Foamy eggs = broken structure.
Keep it calm. Slow mixing wins.
2. Always Preheat the Pan
Cold batter + cold pan = flat cake.
That first heat shock creates lift.
3. Use Tapioca Starch Only
Flour won’t give the same chew.
This is what makes it a true honeycomb pandan cake.
4. Avoid Opening the Oven
You’ll be tempted. Don’t.
Let it bake fully before checking.
5. Cool It Properly
Upside down cooling helps maintain height.
It’s a small step with big payoff.
Common Mistakes (And Fixes)
Cake Didn’t Form Honeycomb
Likely causes:
- Overmixed eggs
- Pan not hot enough
- Oven opened too early
Cake Is Dense
Could be:
- Too much starch
- Batter not strained
Cake Collapsed
Usually from:
- Sudden temperature change
- Underbaking
Variations You Can Try
Once you nail the classic version, you can experiment.
1. Vanilla Honeycomb Cake
Skip pandan. Add vanilla extract instead.
Milder flavor. Great for beginners.
2. Coffee Twist
Add a teaspoon of instant coffee.
Pairs nicely with coconut.
3. Layered Look
Split batter. Add pandan to one half.
Pour in layers for a striped cake.
4. Mini Cakes
Use muffin tins.
Shorter bake time. Same chewy texture.
Why This Cake Is Worth Trying
I’ll be honest—this isn’t a “throw everything in a bowl” recipe.
But it’s rewarding.
You slice into it and see those honeycomb tunnels… and it feels like you pulled off something special.
Also, it stores well. The texture stays chewy for days.
Serving Ideas
This Vietnamese pandan honeycomb cake works best simple.
- Serve slightly warm
- Pair with tea or coffee
- Add fresh fruit on the side
No heavy frosting needed.
Storage Tips
- Room temp: 1–2 days in airtight container
- Fridge: up to 5 days
- Reheat: microwave for 10–15 seconds
It softens again beautifully.
FAQ About Vietnamese Honeycomb Cake
What is banh bo nuong made of?
It’s made from tapioca starch, coconut milk, eggs, sugar, and pandan extract. These create the chewy and airy structure.
Why is my honeycomb cake not forming tunnels?
Most common reason is overwhisked eggs or a cold pan. Both affect how the cake rises.
Can I make this without pandan?
Yes. You’ll still get a honeycomb cake recipe, just without the green color and aroma.
Is this cake gluten-free?
Yes. Tapioca starch contains no gluten.
What does pandan taste like?
It’s lightly sweet and aromatic. Some say it reminds them of vanilla with a grassy note.
How do I know when the cake is done?
The top should be golden and firm. A skewer should come out clean.
Can I freeze banh bo nuong?
Yes. Wrap slices tightly and freeze for up to a month. Reheat before serving.
Final Thoughts
This Vietnamese dessert recipe is one of those quiet showstoppers. It doesn’t rely on frosting or decoration. It wins with texture and aroma.
If you’ve never tried making a pandan cake recipe before, start here.
Take your time. Follow the steps. And don’t rush the process.
Once you get that perfect honeycomb inside, you’ll know—it was worth it.
